Battery switch on travel trailer function is crucial for managing your RV’s power. Understanding how this simple yet vital component works is key to preventing costly battery drain and ensuring your electrical systems run smoothly. This guide will walk you through the different types of switches, their operation, troubleshooting tips, and essential safety precautions. We’ll cover everything from basic functionality to advanced interactions with other electrical components in your travel trailer.
From preventing dead batteries to maximizing your solar power, mastering your battery switch is a valuable skill for any RVer. We’ll explore the various switch types, detailing their advantages and disadvantages to help you choose the best setup for your needs. We’ll also tackle common problems and offer solutions to keep your power running reliably on the road.
Battery Switch Types in Travel Trailers
Choosing the right battery switch for your travel trailer is crucial for managing your power sources effectively and preventing accidental drain. Understanding the different types available will help you make an informed decision. This section details the common types, their inner workings, and their respective pros and cons.
Battery Switch Types and Their Internal Workings
Several types of battery switches are used in travel trailers, each offering a different level of control over your battery banks. The most common are the 1-2-Both switches and the 1-2-Off switches. Let’s explore their internal mechanisms.
| Switch Type | Diagram | Advantages | Disadvantages |
|---|---|---|---|
| 1-2-Both | Imagine a three-position rotary switch. Position 1 connects to battery 1 only. Position 2 connects to battery 2 only. Position “Both” connects both batteries in parallel. Internally, this involves a series of contacts that physically connect and disconnect based on the switch’s position. Think of it like a simple selector switch directing the current flow. | Simple operation, allows for charging either battery individually or both simultaneously. Good for managing two distinct battery banks, such as a house battery and a starting battery. | Limited functionality. No way to completely isolate batteries from each other or the load. Potential for cross-current if one battery is significantly weaker than the other. |
| 1-2-Off | Similar to the 1-2-Both switch, but with an added “Off” position. This position completely disconnects both batteries from the load, preventing parasitic drain. Internally, this adds another set of contacts that break the circuit entirely in the “Off” position. | Provides complete isolation of the batteries from the load, preventing parasitic drain when the trailer is stored for extended periods. Allows individual battery charging. | Still lacks the ability to connect batteries in series for higher voltage applications. Slightly more complex than a 1-2-Both switch. |
| Perko Switches (and similar multi-position switches) | These switches offer more complex configurations, often with multiple banks and more control. They might include positions for combining batteries in parallel, series, or isolating individual banks completely. The internal mechanism involves a more sophisticated system of contacts and switching paths. Imagine a more complex version of the 1-2-Both or 1-2-Off switches, with additional positions for various battery configurations. | Greater flexibility and control over multiple battery banks. Allows for series/parallel configurations for higher voltage or current capacity. | More complex to operate and understand. More expensive than simpler switches. |
Comparison of Battery Switch Advantages and Disadvantages
The choice between different battery switch types depends largely on the complexity of your electrical system and your needs. Simpler switches like the 1-2-Both are suitable for basic setups, while more advanced switches are necessary for managing multiple batteries or requiring series/parallel configurations. The 1-2-Off switch offers the added benefit of completely isolating your batteries to prevent parasitic drain, a significant advantage for long-term storage.
More sophisticated multi-position switches provide the most control but come with increased complexity and cost.
Function and Purpose of the Battery Switch: Battery Switch On Travel Trailer Function
The battery switch is a crucial component in a travel trailer’s electrical system, acting as the central control for power flow to and from the house batteries. It’s essentially a safety and management device that prevents unwanted battery drain and facilitates efficient charging. Understanding its function is key to maintaining your trailer’s electrical system and preventing costly repairs.The primary function of the battery switch is to isolate the house batteries from the rest of the trailer’s electrical system when not in use.
So, you’re an audiophile who travels? Awesome! Check out this guide on building the perfect audiophile travel setup for pristine sound on the go. It covers everything from portable DACs to noise-cancelling headphones. Want something a little more luxurious? Then head over to this other resource for a more in-depth look at high-end options for your audiophile travel setup , focusing on premium components and build quality.
Remember, great sound doesn’t have to stay at home!
This prevents a slow drain on the batteries, which can leave you with a dead battery when you’re ready to use your trailer. It also manages the flow of power between the house batteries and the tow vehicle’s charging system, allowing the batteries to charge while traveling.
Battery Switch and Power Flow Management
The battery switch typically offers several positions, often including “Off,” “Battery,” “Both,” and sometimes “Shore Power.” In the “Off” position, all power to the house batteries is completely cut off, preventing any drain. The “Battery” position connects only the house batteries to the trailer’s 12-volt system, allowing you to use appliances and lights powered by the house batteries. The “Both” position connects both the house batteries and the tow vehicle’s charging system, allowing the batteries to charge while driving.
This is important because it ensures the batteries are topped off for use at the campsite. Some switches also incorporate a “Shore Power” position that connects the trailer’s electrical system to an external power source (like a campground hookup), bypassing the house batteries. This can be helpful for running appliances directly from shore power without putting strain on your batteries.
Preventing Battery Drain
Leaving your battery switch in the “Battery” or “Both” position when the trailer is stored for extended periods can lead to significant battery drain. This is due to the small but continuous current draw of various components in the trailer, such as clocks, smoke detectors, and even the battery management system itself. These small drains, when left unchecked, can completely discharge your batteries over time, rendering them unusable and potentially causing damage.
So, you’re an audiophile who travels? Awesome! Check out this guide on building the perfect audiophile travel setup for amazing sound on the go. It covers everything from portable DACs to noise-cancelling headphones. But if you’re after something a bit more luxurious, then explore this other resource on audiophile travel setups focusing on high-end, compact solutions for the discerning listener.
Remember, good sound doesn’t have to stay at home!
By switching the battery switch to the “Off” position, you effectively disconnect the house batteries from the trailer’s system, preventing any parasitic drain and ensuring your batteries remain charged for your next adventure. This simple act can save you considerable time, money, and frustration in the long run.
Troubleshooting Common Battery Switch Issues
Your travel trailer’s battery switch is a critical component, ensuring you can power your appliances and systems. When it malfunctions, it can leave you stranded without power. Understanding common problems and troubleshooting steps will help you quickly diagnose and fix the issue. This section details common problems and provides a systematic approach to resolving them.
Several issues can cause your battery switch to malfunction. These often stem from simple problems easily resolved with basic tools and a little know-how. However, more serious problems might require professional assistance. Knowing the signs and how to approach troubleshooting will save you time and potential frustration.
Common Battery Switch Problems
The most frequent problems with travel trailer battery switches involve the switch itself, its connections, or corrosion. A faulty switch might simply be worn out or damaged from exposure to the elements. Loose connections, often caused by vibration during travel, can interrupt the electrical flow. Corrosion, especially in humid or salty environments, can build up on terminals and prevent a good connection.
Troubleshooting Steps for a Malfunctioning Battery Switch
A systematic approach is key to effectively troubleshooting a non-functioning battery switch. By following these steps, you can isolate the problem and determine the best course of action.
- Visually Inspect the Switch and Connections: Begin by carefully examining the switch for any obvious signs of damage, such as cracks, burns, or loose parts. Check the terminals for corrosion and ensure all wires are securely connected. Loose screws or corroded terminals are common culprits.
- Test the Switch’s Operation: With the switch in the “on” position, use a multimeter to check for voltage at the battery terminals and at the output terminals of the switch. If you have voltage at the battery but not at the output, the switch itself is likely the problem. If there is no voltage at the battery terminals, you may have a separate battery or wiring issue.
- Check for Continuity: Use the multimeter to check for continuity across the switch. This verifies that the internal components of the switch are functioning correctly. Lack of continuity indicates a faulty switch.
- Clean and Tighten Connections: If corrosion is present, clean the terminals with a wire brush and a battery terminal cleaner. Make sure all connections are tight and secure. Re-tightening loose screws can often solve intermittent problems.
- Inspect Wiring: Trace the wiring from the switch to the battery and to the trailer’s electrical system. Look for any broken or frayed wires. Repair or replace damaged wiring as needed.
- Replace the Switch (If Necessary): If the switch is faulty despite cleaning and tightening connections, it needs to be replaced. Make sure to purchase a replacement switch with the correct amperage rating for your system.
Troubleshooting Flowchart
The following describes a flowchart for troubleshooting a non-functioning battery switch. Imagine a diagram with boxes and arrows. Each box represents a step, and the arrows indicate the flow of the troubleshooting process.
Start: Battery Switch Not Working
Box 1: Visually inspect switch and connections for damage, corrosion, or loose wires. If found, proceed to Box 4. If not, proceed to Box 2.
Box 2: Test voltage at battery terminals and switch output terminals using a multimeter. Voltage at battery but not at output? Proceed to Box 5. No voltage at battery? Investigate battery and charging system.
Box 3: Check for continuity across the switch using a multimeter. Continuity present? Investigate wiring. No continuity? Proceed to Box 5.
Box 4: Clean terminals, tighten connections. Does the switch now work? Yes: End. No: Proceed to Box 5.
Box 5: Replace the battery switch. End.
Safety Precautions When Working with Battery Switches
Working with your travel trailer’s battery system requires caution. Improper handling can lead to serious injury from electrical shock, burns, or explosions from escaping gases. Always prioritize safety when dealing with batteries and their associated switches. Understanding and following these precautions is crucial for protecting yourself and your equipment.
Incorrect operation of the battery switch can lead to several dangers. For example, accidentally leaving the switch on while the trailer is stored for extended periods can drain the batteries completely, potentially damaging them beyond repair. Conversely, failing to disconnect the batteries before performing maintenance on electrical systems can result in dangerous electrical shocks. Furthermore, sparks generated during improper switch manipulation near flammable materials could ignite a fire.
Finally, improper handling of battery terminals can lead to acid burns.
Potential Dangers of Incorrect Battery Switch Operation, Battery switch on travel trailer function
Improper use of the battery switch poses several risks. Leaving the switch in the “on” position while the trailer is in storage can lead to complete battery discharge, rendering them unusable and requiring costly replacements. Attempting repairs or maintenance on the electrical system with the battery switch engaged creates a significant risk of electrical shock, potentially resulting in injury or even death.
A short circuit caused by incorrect wiring or accidental contact near the switch could generate sparks, igniting flammable materials nearby and causing a fire. Finally, incorrect handling of battery terminals during switch operation can result in exposure to corrosive battery acid, leading to burns and skin irritation.
Recommended Safety Equipment
Before working with your travel trailer’s battery system, gather the necessary safety equipment. This will help mitigate potential hazards and ensure your safety.
A comprehensive safety kit should include:
- Safety glasses: Protect your eyes from splashes of battery acid or flying debris.
- Rubber gloves: Insulate your hands from electrical shocks and protect against battery acid.
- Insulated tools: Use tools with insulated handles to prevent electrical shocks when working near battery terminals.
- Baking soda: Neutralizes battery acid in case of spills.
- Water: For rinsing in case of acid spills.
- A well-ventilated area: Battery gases are harmful, so ensure adequate ventilation.
Disconnecting Batteries Safely
Always disconnect the negative (-) battery terminal first when disconnecting batteries. This prevents accidental shorts and reduces the risk of electrical shock. When reconnecting, attach the positive (+) terminal first and then the negative. This sequence minimizes the risk of sparks. Remember to turn off any appliances before disconnecting the battery to avoid damage.
Before touching any battery components, ensure your hands are clean and dry.
Connecting and Disconnecting Batteries using the Switch
Properly using your travel trailer’s battery switch is crucial for managing your power and preventing potential issues. This section details the correct procedures for connecting and disconnecting your batteries, ensuring both safety and the longevity of your system. Understanding these steps will help you confidently manage your trailer’s power supply.
The battery switch acts as a central control point, allowing you to easily connect or disconnect your batteries from the trailer’s electrical system. Most switches offer several positions: “Off,” “Battery 1,” “Battery 2,” and sometimes “Both.” Knowing your switch’s specific configuration is the first step to safe and effective use.
Battery Switch Operation
Before interacting with the switch, always ensure your hands are dry and that you’re working in a well-ventilated area. Battery fumes can be dangerous. The following steps Artikel the correct procedure for operating your battery switch, regardless of the specific make or model.
Image 1: Show a close-up of the battery switch with labels indicating the different positions (1, 2, both, off). The image should highlight the clear markings on the switch, possibly showing a rotary dial or a series of toggles, and clearly showing the position of each setting. The image should also depict the switch’s location within the travel trailer, perhaps near the battery compartment or inside a dedicated electrical panel.
The surrounding area should be clearly visible, emphasizing the importance of a clean and organized workspace.
- Turning the Switch “Off”: To completely disconnect the batteries from the trailer’s electrical system, rotate or toggle the switch to the “Off” position. This prevents accidental discharge and protects sensitive electronics. This is a crucial step before performing any maintenance on the battery system or leaving your trailer unattended for an extended period.
- Connecting Battery 1: To connect only the first battery (often the main house battery), rotate or toggle the switch to the “Battery 1” position. This will power only the circuits connected to this battery. This is useful for conserving power if you only need to run a few essential appliances.
- Connecting Battery 2: Similarly, to connect only the second battery (often a dedicated deep-cycle battery for things like running a refrigerator), rotate or toggle the switch to the “Battery 2” position. This isolates the first battery, preserving its charge for other systems.
- Connecting Both Batteries: To connect both batteries, rotate or toggle the switch to the “Both” position. This provides the maximum power capacity for your trailer’s electrical system, ideal for running multiple appliances simultaneously. This is useful when you are camping and need to power many devices.
Maintaining the Battery Switch and Connections
Regular maintenance ensures the longevity and reliable performance of your battery switch and its connections. Neglecting this can lead to corrosion, poor connections, and potential electrical failures.
- Regular Inspection: Periodically inspect the switch and its connections for signs of corrosion, loose wires, or damage. Clean any corrosion with a wire brush and baking soda paste, followed by a thorough rinse with water.
- Tighten Connections: Ensure all wire connections are securely tightened. Loose connections can lead to overheating and potential fire hazards. Use appropriate tools and avoid over-tightening.
- Lubrication (if applicable): Some battery switches may benefit from periodic lubrication of moving parts. Consult your switch’s manual for specific recommendations.
- Environmental Protection: Protect the switch from exposure to the elements, especially moisture. A waterproof cover or enclosure can extend its lifespan significantly.
Successfully managing your travel trailer’s battery system hinges on understanding your battery switch. By learning about the different types of switches, their functions, and proper maintenance, you’ll be equipped to handle any electrical situation. Remember safety first – always disconnect batteries before working on the switch and follow proper procedures. With a little knowledge and care, you can keep your RV’s power flowing smoothly for many adventures to come.
Q&A
What happens if my battery switch is faulty?
A faulty switch can lead to dead batteries, inability to charge, or even electrical fires. Troubleshooting steps involve checking connections and the switch itself for damage.
How often should I check my battery switch?
Regularly inspect your battery switch for corrosion, loose connections, and proper operation. A visual check every few months is recommended, especially before long trips.
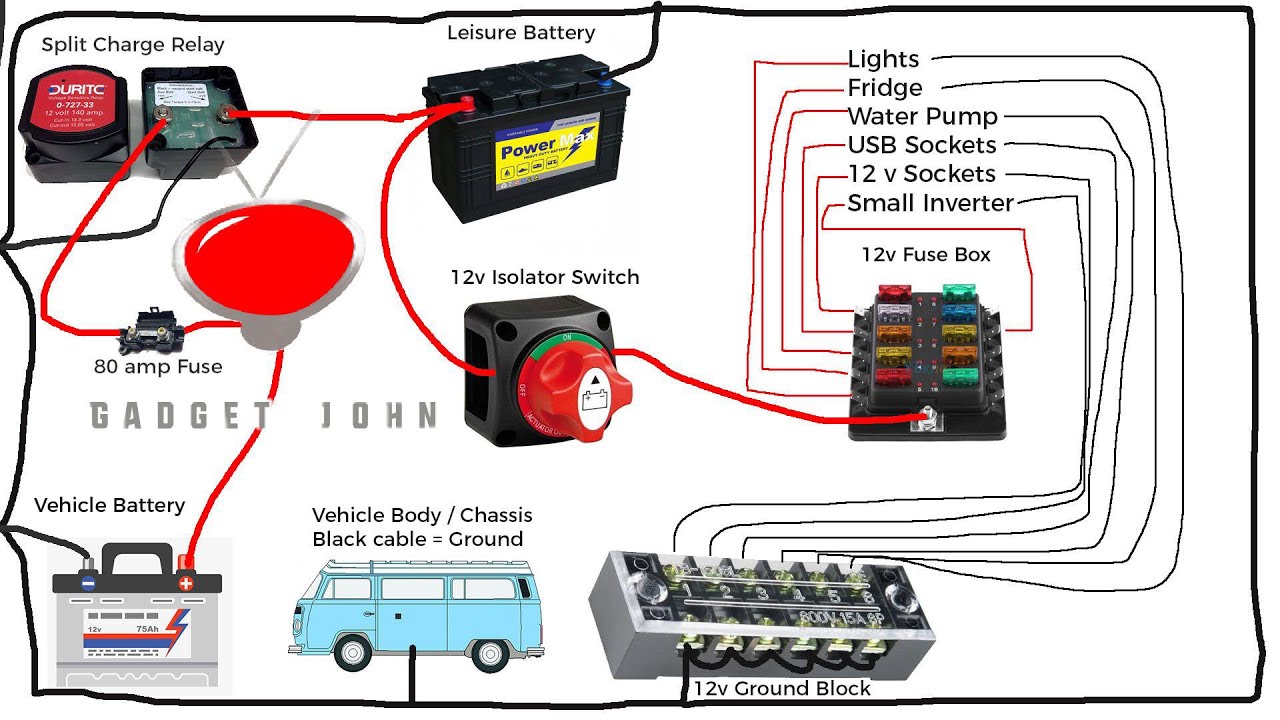
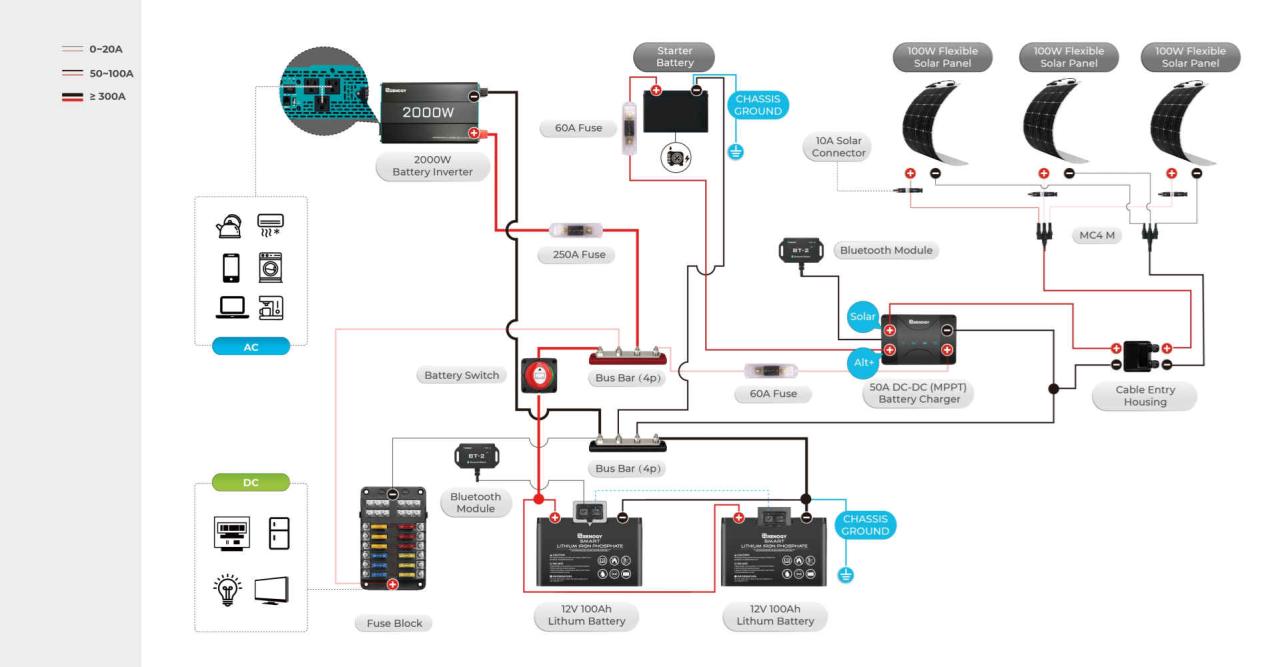
Can I use a battery switch with a solar panel system?
Yes, but the setup may vary depending on your system. The battery switch will typically control the flow of power from your house batteries to other systems. Consult a professional if you are unsure.
My battery switch is stuck. What should I do?
Try lubricating the switch mechanism with a penetrating lubricant. If that doesn’t work, you might need a replacement switch.
